Satchel Sample Approval: 7 Details to Photograph
Sample approval fails for one reason: the bag that was approved and the bag that shipped were compared by memory. A signed sample helps, but it sits in a showroom, it ages, and by the third reorder nobody can say which of the two samples on the shelf was the approved one. A numbered photo set with a scale in frame is what survives, because it travels by email, it reopens on any device, and it can be attached to a purchase order clause.
Why a Photo Set Beats a Signed Sample Alone
Keep both, but understand what each one does. The sealed sample is the physical reference for material hand-feel, smell and weight. The photo set is the reference for position, proportion and finish, which is where most disputes actually happen: a strap anchored ten millimetres lower, a lock plate two millimetres off centre, a logo that moved because the die was re-laid.
Two rules make a photo set usable. Shoot everything on the same day, in the same light, against the same background, so that a later comparison is about the bag and not about the camera. And name the files by detail and revision, not by date: cbds-satchel-r2-flap-lock.jpg tells the factory which revision it is looking at, while IMG_4471.jpg tells nobody anything.
The Seven Details Worth Photographing
Seven is not arbitrary. These are the points where a satchel is built by hand, where a small drift is invisible in a single photo and obvious in a bulk shipment.
1. Flap and lock alignment. Shoot the bag closed, straight on, with the flap seated. The measurement that matters is the gap between the flap edge and the body edge on both sides, plus the offset between the lock plate and the catch. A flap that sits one millimetre off on the sample sits three off at volume, because the operator learns the tolerance from the sample.
2. Strap drop at the anchor. Measure from the top of the handle or the strap anchor to the top of the bag, and photograph the anchor itself from the side. This is the number buyers quote to their own customers, and it is the one most often changed silently when a factory substitutes a strap length.
3. Handle attachment. Where the handle meets the body, shoot both ends. Look at the number of stitch rows, the thread colour, and whether the anchor leather is folded or raw-edged. A handle that is stitched with two rows on one end and three on the other is a bulk problem, not a sample problem, but the sample is when you can still fix it for free.
4. Hardware finish. Line up every metal part in one frame — lock, rings, feet, zip pull, strap adjuster — with a colour card in shot. Different suppliers for the lock and the feet is normal, and a light gold lock next to a yellow gold ring is the single most common mismatch on a mid-price satchel.
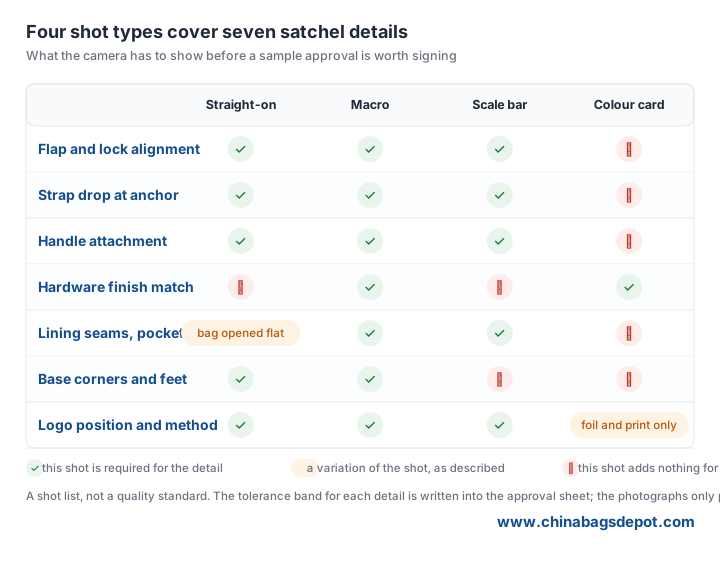
5. Lining seams and pocket depth. Open the bag flat and shoot the interior in one frame. Pocket depth, zip end position and the seam allowance at the lining join are invisible from outside and expensive to argue about later, because the fix is a new lining pattern rather than a re-stitch.
6. Base corners and feet. Shoot the bag upside down. The corners take the wear, and the question is whether the foot is riveted through the base panel or only through the lining. Also record the edge paint colour here, because a base that is painted a shade darker than the body reads as a defect at retail.
7. Logo position and method. Shoot the logo straight on with a ruler in frame, and note the method: deboss, foil, metal plate or print. Position is the value here — distance from the flap edge and from the lock centre — because a logo that drifts three millimetres is invisible on a sample table and obvious on a shelf of twelve.
How to Shoot Each One So It Can Be Compared
Four shot types cover the list, and the matrix above is the working version of it. Straight-on gives position and proportion. Macro gives stitch count, rivet head and edge paint quality. A scale bar in frame turns a picture into a measurement. A colour card turns a picture into a colour reference that survives a different monitor.
Keep the camera at the same distance for every shot in the set and put the bag on the same surface. Phone cameras are fine; a moving camera position is not, because perspective change is what makes two identical bags look different six months later.
What to Write Next to the Photo
A photo without a tolerance is an opinion. Put a short table in the approval sheet with the four or five numbers that matter for this bag: flap gap, lock offset, strap drop, logo position, and hardware colour against the agreed standard. Give each one a tolerance band the factory can hold, and have the sample signed against that band rather than against the photo alone.
Write down what happens when a number falls outside the band, too. The usual arrangement is that a flap gap above the band is a defect, a strap drop outside the band is a rework, and a hardware colour outside the band is a rejection of that component lot rather than of the finished bag.
Signing Off: The Sample Register

Three copies of the approved sample, sealed and labelled with the revision letter: one at the factory, one with your QC agent, one in your own store room. Each copy carries the same photo set number on the label, so a query eighteen months later resolves to a folder rather than a search.
Then define what triggers re-approval, in writing. A change of material source, a new hardware supplier, a moved logo, or a different lining colour are all new samples; a change of thread brand is not. Without that line, every reorder quietly becomes a new sample that nobody photographed.
Browse the satchel range we build most often, then send us the seven-shot list for your own style. We will return the photo set with a scale in frame, the tolerance table filled in, and the sealed samples labelled to the same revision — so the bulk shipment is compared against a record and not against a memory.
Need custom bags for your next project?
Send your bag style, size and print artwork for a quote and a digital proof.
Get a free quote


