Tote Bag Handle Attachment: 4 Stitch Patterns and Load Limits
Tote bags rarely fail in the body. They fail where the handle meets the bag: the stitch line pulls through the canvas, the tape tears at the box, or the join holds while the fabric around it rips. Each failure is decided by the attachment pattern, the thread and the reinforcement behind it, and each is visible on a sample in under a minute. Here is how the four common patterns behave and how to test a join before you approve 2,000 pieces.
Why the Handle Join Fails First
A tote carried by one hand puts the entire load through two joins. A 12 kg bag with two handles puts 6 kg on each join, and because the handle is narrow the load lands on a stitch line 30 to 40 mm long instead of spreading across the bag face. The fabric around the join is also the same fabric the bag is cut from, so a light canvas that carries the body comfortably can still tear at the handle because the load is concentrated rather than distributed.
Three failure modes cover almost every return. The stitch line tears through the fabric, leaving the handle attached to a strip of canvas. The tape fails next to the stitch line, where the needle has cut the webbing. The join survives and the bag face tears from the box corners. Each mode has its own fix: reinforcement patch, wider tape, or pattern choice.
The Four Attachments and What Each One Does
The X-box is the default for canvas totes. The handle tape runs down the bag face, and the machine sews a rectangle with an X through it. The X crosses the load path, so the stitches resist pull in both directions and the load spreads over four corners. It is slower to sew than a straight line, and the density of the X is what decides whether the join holds: a sparse X with 6 mm stitches behaves like a decoration, a tight X at 3 mm spacing does the work.
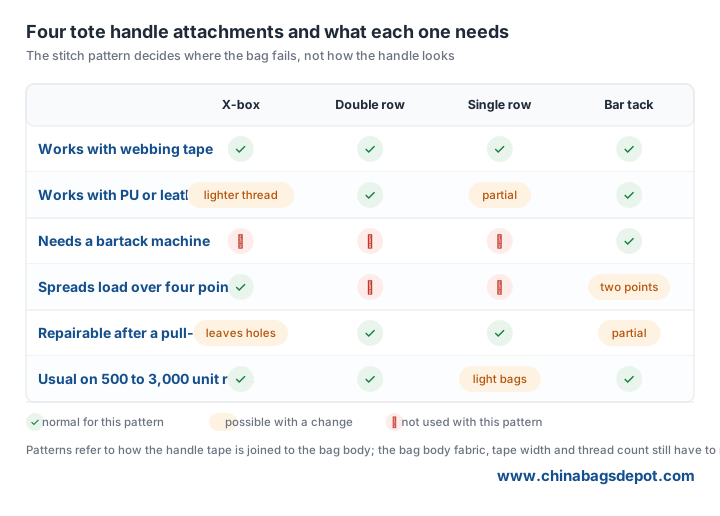
The double straight row is the production-friendly choice: two parallel rows of stitching down each side of the tape, spaced 3 to 4 mm apart, running 60 to 80 mm down the bag face. It spreads load along the tape rather than across it, which suits webbing handles on heavier canvas. The single row is the light-bag pattern: promotional totes, non-woven bags, anything expected to carry a catalogue and a bottle of water rather than groceries for a week.
The bar tack is a short dense block of zigzag stitching, usually 8 to 12 mm long, placed across the tape at the top of the join. It is fast, it needs a dedicated bartack machine, and it concentrates the load on two short bars. Bags built this way pass a light-load test and fail when the bag is carried loaded every day, because the bar acts as a stress riser in the fabric beneath it.
Matching Thread, Tape and Needle to the Pattern

Thread is where cheap orders show. A bonded polyester thread at Tex 70 to Tex 90 suits most tote joins; a thin cotton thread looks correct on the sample and abrades through in service, because the needle hole is a cut in the webbing and a thin thread leaves more of it open. Stitch density of 8 to 10 stitches per inch is the normal band: fewer stitches per inch means each stitch carries more load, more than 12 per inch starts cutting the tape instead of joining it.
Tape width changes the pattern. A 25 mm webbing handle takes a single or double row neatly; a 38 mm tape on heavy canvas wants the X-box, with room for the X inside the box. A leather handle takes the same pattern with a lighter thread and a longer stitch, since leather does not recover from a dense needle line.
The reinforcement patch is the cheapest upgrade in the bag. A 60 by 60 mm piece of the same canvas, or a stiff interlining, sewn behind the join doubles the material the stitch line must tear through. Ask for it on any tote rated above a light promotional load.
Testing the Join Before You Approve the Order
You do not need a laboratory. Fill the sample to its rated load, hang it from a fixed hook by both handles and leave it 24 hours. Then repeat at twice the rated load for one hour and watch the join, not the bag. A join that creeps or shows a whitened line around the box is already failing.
Add a cycle test, because a tote is carried and set down far more often than it is loaded once. Load, lift, hold five seconds, set down, repeat 100 times on the same bag. Most join failures appear between cycles 40 and 80, when the needle holes have opened enough for the thread to saw through. Photograph the join afterwards; that picture persuades a factory faster than any written tolerance.
Finally, check the reverse side. A join that looks clean outside can have loose bobbin tension underneath, and that is where the thread abrades first. Loops or a wandering stitch line underneath mean the machine tension is wrong and the join will fail whatever the pattern.
Writing It Into the Purchase Order
Specify the join in numbers, not adjectives: pattern name, stitch density per inch, thread type and size, tape width, join length down the bag face, and whether a reinforcement patch is included. Add one line on the test: the join must hold twice the rated load for one hour without visible distortion. A factory that receives that paragraph quotes it accurately; one that receives a photo quotes whatever the photo suggests.
At inspection, treat the join as its own check. On a 2,000-piece order, pull 20 bags, hang each at rated load for ten minutes and inspect both sides. Record how many joins show fabric whitening or loose underside stitching; that number predicts the returns better than overall appearance.
Tell us the load the bag has to carry, the handle material and the quantity, and we will quote the attachment pattern with the reinforcement patch included where it belongs. Browse the tote bags range for the bodies these joins are built on, then request a sample sewn to your stitch specification.
Need custom bags for your next project?
Send your bag style, size and print artwork for a quote and a digital proof.
Get a free quote


