Pencil Case Sample Approval: 7 Details to Photograph
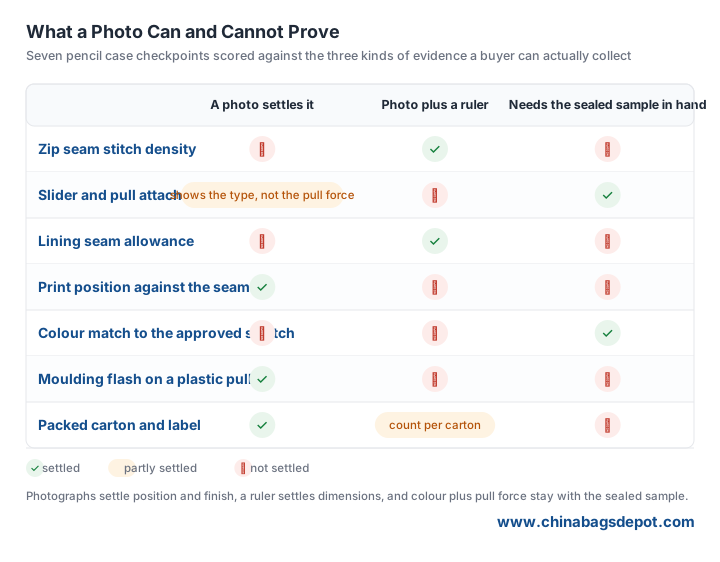
A pencil case is approved or rejected on seven details, and six of them are decided by how the sample was photographed rather than by what was said on the call. The buyer who receives a sample with no ruler in frame, no light reference and no shot of the interior has nothing to compare the bulk order against three weeks later. Fix the seven shots before the sample leaves the factory and the approval becomes a ten-minute review instead of a month of argument.
Fix the Seven Shots Before the Sample Arrives
Send the shot list with the sample request, not after the sample lands. The list has seven frames: the closed case from the front, the zip tape seam with a rule in the same plane, the slider and its pull, the interior lining seam, the printed or embroidered logo measured against a seam, the fabric against the approved swatch under daylight, and the first sealed carton with its label.
The setup is the same for all seven. A mid-grey sweep, two lights at about 45 degrees from both sides with matched colour temperature, the camera on a tripod about one metre out, and a steel rule taped into the frame whenever a dimension is in question. Fill the frame with the detail instead of cropping it later: a 300 mm rule across a zip seam gives a scale that survives any zoom. Name each file with the style code and the shot number so the set can be reassembled from an inbox months later.
Shot Two: Stitch Density on the Zip Tape
The seam that holds a pencil case together is the one along the zip tape, and it is the seam that fails first when a machine is running fast. Photograph it with the rule lying on the same surface, close enough that individual stitches can be counted, and count them over a fixed window rather than describing the seam as tight or loose.
Two defects belong in the same frame: skipped stitches and needle marks. On PU and coated canvas a needle that is too large leaves a hole that does not close, and a row of visible holes along the zip tape becomes a leak point for the lining and a cosmetic fault on the exterior. A photograph taken at this distance shows both; a photograph taken from 40 cm shows neither.
Shot Three and Four: The Slider, the Pull and the Lining Seam
The slider shot records the type, not the quality: nylon coil or metal, auto-lock or non-lock, and whether the pull is a cord, a moulded plastic tab or a metal die-cast part. What the photograph cannot record is pull force, and pull force is what a child tests in the first week of a school term. If the order depends on a plastic puller, ask for the pull force on the sample report and keep the sealed sample as the reference.
The lining seam is the detail most often left out of a sample set and the one that shows up in returns. Photograph it from inside the case, with the rule against the seam allowance, and look for a raw edge that the binding failed to catch. A seam allowance that is even on the sample and uneven on the bulk order is a cutting issue, and the interior photograph is the only evidence that separates the two.

Shot Five: Logo Position, Measured From a Seam
Measure the logo from the nearest seam, never from the cut edge of the panel: the cut edge moves with the seam allowance, the seam does not. A printed logo that sits three millimetres off is invisible on a flat lay and obvious on a shelf, so the photograph needs the rule in frame and the measurement written into the sign-off sheet next to the shot number.
Record the decoration method as well. Screen print, heat transfer and embroidery fail in different ways, and a buyer comparing a heat transfer sample against a screen-printed bulk order has no case if the method was never written down. Note the colour reference with the shot: a Pantone number means something only when it is paired with the substrate.
Shot Six: Colour Under Two Lights
Canvas and coated polyester shift under different light sources, and a sample approved under an office tube light can look wrong under retail lighting. Shoot the fabric against the approved swatch in the same frame under a daylight-balanced source at around 6500 K, then take a second frame under warm light and keep both. The pair tells the buyer how much of the difference is the fabric and how much is the room.
Write the light source into the file name. A colour argument that starts with two photographs taken under unknown lights cannot be resolved by looking harder at them.
Shot Seven: The Packed Carton and Its Label
The last shot is the one most buyers skip: the first sealed carton, closed, with the shipping label and the quantity marking visible. It records the polybag thickness on the packing list, the carton ply, the count per carton and where the label sits. Those four facts decide whether a retail-ready shipment can be cross-docked without repacking, and they are cheap to confirm at the sample stage and expensive to discover at the port.
Send us the style, the zip type and the decoration method, and we will send the seven-shot list with the sample so the approval file is complete before the bulk order starts.
Need custom bags for your next project?
Send your bag style, size and print artwork for a quote and a digital proof.
Get a free quote


