Cooler Bag Ice Retention: A 24-Hour Test Protocol
A 24-hour ice test does not tell you how cold a bag stays on a beach. It tells you one narrower thing: how much of a known mass of ice a bag converts to water, in a room at a fixed temperature, with the lid opened a known number of times. That is still the most useful number you can put next to a supplier claim, because it is the only one two factories can reproduce.
Set the conditions before you buy the ice
Three variables decide whether the result means anything: ambient temperature, fill ratio and lid activity. Fix all three in writing before the first sample goes in, and keep them identical across every bag you compare.
Ambient. Run the test in a room held at 25 ±1 °C, out of sunlight and away from an air-conditioning draught. A bag sitting in a 30 °C room will lose noticeably more ice in the same 24 hours, so a result without a recorded ambient is not a result.
Fill ratio. Ice cools air, and air is what the walls have to hold. Fill roughly two-thirds of the usable volume with ice and leave the rest as headspace, then weigh the ice. A bag tested half full will always look worse than the same bag tested full, which is how two suppliers can quote very different numbers for the same construction.
Initial temperature. Pre-chill every bag at ambient for 12 hours before loading. A bag pulled from a cold store starts the test with a free advantage that disappears in the first two hours and flatters the result.
Build the rig: two probes, one scale, one log
You need less equipment than most buyers assume. A calibrated kitchen scale to 5 g, two thermocouple probes, a logger that records every 5 minutes, and a plastic tray to catch meltwater.
Place probe one in the centre of the headspace, about 30 mm above the ice surface — that is the air your food actually sits in. Tape probe two to the outside wall at mid-height to see how much heat is crossing the panel. Do not push a probe into the ice: ice sits at 0 °C until it is gone, so an in-ice probe draws a flat line that hides every difference between bags.
Run the bag sealed for the first 12 hours, then open the lid for 10 seconds once an hour for the remaining 12. That single change separates a bag that performs in a lab from one that survives a picnic, because every opening dumps the cold air the walls were protecting.

What to measure, and when
Weigh the drained meltwater at 6, 12 and 24 hours and express it as a percentage of the starting ice mass. Percentage, not grams, because it lets you compare a 12-litre lunch bag with a 30-litre family cooler on the same axis.
Record three numbers alongside it: the headspace temperature at each checkpoint, the time the headspace first crosses 5 °C, and the wall probe reading at hour 24. The 5 °C crossing is the one that matters commercially — it is the usual cold-chain line for perishable food, and it converts an abstract ice-loss figure into a shelf life your customer can plan around.
Photograph the interior at hour 24. Condensation pattern shows where the cold air escaped: water pooling at the zipper teeth means the closure is the weak point, water along a bottom seam means the seam tape or the stitch line is.
Read the curve, not the endpoint
The headspace curve has three phases and each one indicts a different part of the bag. A fast rise in the first 60 minutes is normal — the air above the ice has to be cooled from ambient. A steep rise between hours 2 and 8 points at the closure and the seam. A slow, steady climb after hour 12 points at wall thickness and foam density.
If two samples end at the same 24-hour figure but one rises early and flattens while the other climbs steadily, they are not equivalent products. The early riser will fail a two-hour commute; the steady climber will fail a full day out. Buyers who only compare the final number buy the wrong bag roughly half the time.
Keep the comparison honest
Test bags as they will be sold: same liner, same accessories, no extra gel packs unless the retail pack includes them. Then repeat the run once. A single 24-hour result carries too much noise from ice shape and packing density — crushed ice melts faster than block ice because it has more surface area, so use the same ice form for every sample.
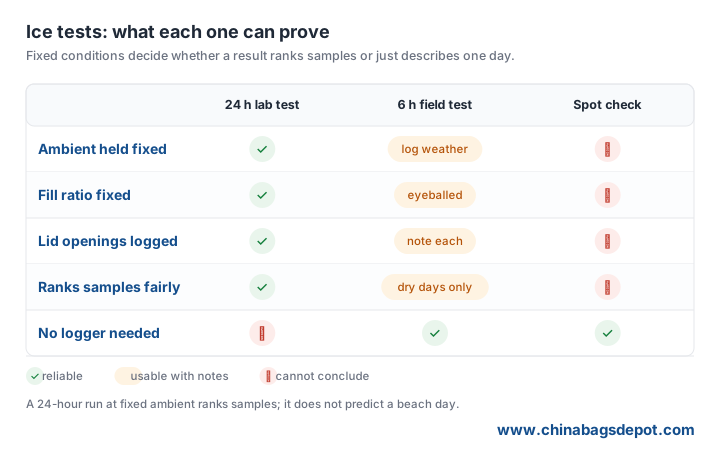
Fix the ice form, the fill ratio, the ambient and the opening schedule, and the ranking becomes stable enough to put in a purchase order. Skip any one of them and you are comparing the operator's habits rather than the bag.
Turn the result into a specification
Convert whatever you measure into a line the factory can accept or reject. "Ice retention 24 hours" is not a specification; "at 25 °C ambient, 2 kg of cubed ice in a 20-litre bag, meltwater under the limit you set from your own baseline run, headspace below 5 °C for the first 8 hours" is one, because both sides can run it and get the same answer.
Ask for the test on production samples, not on a hand-made prototype, since a prototype is usually assembled with more care and more tape than the line will use. Then keep one approved sample in the office and re-run it whenever a shipment feels different. Compare the rest of the picnic cooler bags range on the same protocol and the numbers start to mean something across the range, not just within one order.
Need custom bags for your next project?
Send your bag style, size and print artwork for a quote and a digital proof.
Get a free quote


